 |
| Aperture f 2.0, shutter speed, 1/160th sec. |
Showing posts with label Photo techniques; aperture; depth of field. Show all posts
Showing posts with label Photo techniques; aperture; depth of field. Show all posts
Wednesday, January 12, 2011
Steaming Cup of Tea
This morning, I noticed the steam rising from my cup of freshly brewed green tea. Since I had never photographed steam, I thought I'd give it a try. I moved the cup so the background would be the red of my dining room wallpaper. Moving the cup around the room, it became clear that the steam needs to be lit from the side to be most visible, which in my case, was the filtered light coming through the window coverings. I tried different apertures and shutter speeds and determined the cup and the stream need to be in focus but that the background was more pleasing blurred since there was a pattern on the wallpaper that competed with the steam. Enjoy!


Monday, January 10, 2011
Overland Park Arboretum and Botanical Garden - Visit When the Snow Falls
It doesn't get much better than taking photos when snow has fallen. It snowed most of the day in Kansas City, so not surprisingly, I bundled up, checked my camera battery to make sure it was charged and my compact flash to make sure I had space for new photos and off I went to one of my favorite places - the Overland Park Arboretum and Botanical Gardens. Photography in the Arboretum is fun any day of the year, with so much diversity of subject matter. But when it snows, there are few people who venture out so you can commune with nature in solitude.
Here are a few photos from today. Enjoy - maybe I'll see you at the Arboretum during the next snowfall!
Here are a few photos from today. Enjoy - maybe I'll see you at the Arboretum during the next snowfall!
 |
| Margaret's Pond is nearly frozen. Native grasses are beautiful in the winter, providing color and texture to the landscape |
 |
| With the cloudy sky, snow scenes are a study in white, with the darkness of the trees punctuating the landscape. |
 |
| I am always attracted to reflections. |
 |
| Virgin snow surrounding the benches. I used a shallow depth of field to gradually blur the benches. I was using my 50mm lens at f 1.8. I focused on the near arm rest. The shutter speed was 1/3200 sec with an ISO of 125. You have to overexpose a snow scene (if it is predominantly snow) because a camera's meter will always try to make an image middle grey. If you shoot in RAW, you can make the exposure adjustment in Adobe Camera Raw, which is what I did. |
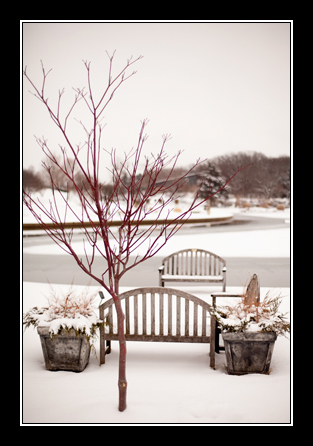 |
| When I was adjusting exposure in ACR, I clicked on "auto" and the scene turned to sepia. I liked the look, with the red tree. It's subjective. |
 |
| Another scene with a red tree that I thought looked nice with the sepia toning. |
Friday, January 7, 2011
More on depth of field
On the Santa photos taken earlier this week, I was demonstrating the "background blur" effect of using different sized apertures to photograph a flat Santa, placing Santa different distances from the background and the camera different distances from Santa. In those photos, it was the effect of the blurred lights in the background that was more important than the Santa.
The photo below show the same depth of field blurred effect. However, in this photo, Kauffman's face is the focal point. The background, including the rest of his body, is not important.
In the photo below, the blur on Carmello's nose is a little distracting, so a slightly smaller aperture or moving the camera farther back would have brought his nose more into focus. The background, however, (someone's legs) would have been totally distracting had it been in focus (a photographer takes what is given to her with a dog!).
The photo below show the same depth of field blurred effect. However, in this photo, Kauffman's face is the focal point. The background, including the rest of his body, is not important.
 |
| 50mm lens f 1.8 camera about 3 1/2 feet from Kauffman Note: Kauffman's nose eyes and eyebrows are the only things in focus. |
In the photo below, the blur on Carmello's nose is a little distracting, so a slightly smaller aperture or moving the camera farther back would have brought his nose more into focus. The background, however, (someone's legs) would have been totally distracting had it been in focus (a photographer takes what is given to her with a dog!).
 |
| 50mm lens f 2 camera about 2 feet from Carmello |
Useful photography technique: you can use a blurred background as:
(1) an important part of the photo, such as softly blurred Christmas lights;
(2) to de-emphasize an unimportant part of the scene;
(3) to emphasize an important feature, such as eyes
Wednesday, January 5, 2011
Depth of field - looking at f-stops
Below are two set of three photos each, taken at different f-stops and distances from the background and subject. Compare these to yesterday's photos and you'll see the difference it makes as you close your aperture. The first set of three was taken at f 4.5 (compared to yesterday's photos taken at f 1.4) The second set of photos was taken at f 9. Many cameras/lenses don't open wider than f 4, so it's difficult to get the softly blurred background shown in yesterday's photos.
 |
| Santa about 4 feet from tree 50mm lens; f 4.5 Camera about 1 foot from Santa |
 |
| Santa about 2 feet from tree 50mm lens; f 4.5 Camera about 1 ft from Santa |
 |
| Santa about 4 feet from tree 50mm lens; f 4.5 Camera about 4 feet from Santa |
 |
| Santa about 4 feet from tree 50mm lens; f 4.5 Camera about 1 foot from Santa Note: Compare detail in lights and tree between f 1.4 (yesterday's shots); f 4.5 and f 9 |
 |
| Santa about 2 feet from tree 50mm lens; f 4.5 Camera about 1 foot from Santa Note: More background detail |
 |
| Santa about 4 feet from tree 50mm lens; f4.5 Camera about 4 feet from Santa Note: With Santa close to tree and smaller aperture, getting detail in both Santa and background |
Tuesday, January 4, 2011
A Year of Photos
Now that I'm able to spend more time as a photographer, I made a New Year resolution to post a photo a day (with technical information about how the photo was made for my photographer friends and those who want to learn more about photography). Considering its already January 4th and I've posted no photos, it seems my resolution is slipping already. So, maybe the resolution is better stated as "trying to take a photo a day and posting when I get the chance".
Below are my first batch of photos. In these I have focused on using a wide open aperture on my 50mm Zeiss lens that opens to a 1.4 f-stop to show the variations in the depth of field, depending on distance of the camera from the subject matter (when the focal length of the lens (50mm) and the aperture (f1.4) have not changed). For those new to photography, "depth of field" is the range of distances over which objects appear acceptably sharp. Depth of field is a complex subject and is dependent on the focal length of the lens, the aperture and the distance from the subject. I will focus on depth of field in my first few posts.
The photos below were taken of a wooden Santa in front of my Christmas tree. The details of the distance from the tree is noted below each photo. As you can see, the farther the subject is away from the background, the more the background becomes blurred.
Useful photography technique: If you are taking photos of a subject and want the background blurred and you have a camera/lens that allows you to choose a wide aperture, take a photo, check the image and background to see if you captured the look you wanted. If not, move the subject further away from the background. If part of the subject is blurred, choose a less wide aperture and/or move back from the subject. Check the image again to make sure you got the look you wanted.
Below are my first batch of photos. In these I have focused on using a wide open aperture on my 50mm Zeiss lens that opens to a 1.4 f-stop to show the variations in the depth of field, depending on distance of the camera from the subject matter (when the focal length of the lens (50mm) and the aperture (f1.4) have not changed). For those new to photography, "depth of field" is the range of distances over which objects appear acceptably sharp. Depth of field is a complex subject and is dependent on the focal length of the lens, the aperture and the distance from the subject. I will focus on depth of field in my first few posts.
The photos below were taken of a wooden Santa in front of my Christmas tree. The details of the distance from the tree is noted below each photo. As you can see, the farther the subject is away from the background, the more the background becomes blurred.
Useful photography technique: If you are taking photos of a subject and want the background blurred and you have a camera/lens that allows you to choose a wide aperture, take a photo, check the image and background to see if you captured the look you wanted. If not, move the subject further away from the background. If part of the subject is blurred, choose a less wide aperture and/or move back from the subject. Check the image again to make sure you got the look you wanted.
 |
| Santa about 4 feet from tree 50mm lens; f1.4 Camera about 1 foot from Santa Note: lights look glowing and little tree detail |
 |
| Santa about 2 feet from tree 50mm lens; f1.4 Camera about 1 foot from Santa Note: more detail in tree |
 |
| Santa about 2 feet from tree 50mm lens; f1.4 Camera about 4 feet from Santa Note: All of Santa included; far more detail in tree |
Subscribe to:
Posts (Atom)

